Within Link2Feed there are several visit types that can be recorded, here you will find information on how to add visits for different programs as well as different ways to capture them in the system.
This article covers the following topics:
- General options available when adding a Visit
- How do I record a visit using Quick Click?
- How do I record a Pantry/Food Bank visit?
- How do I record a Voucher Program Visit?
- How do I record a Generic Program Visit?
- How do I record a CSFP Visit?
- How do I record a TEFAP Visit?
- eSignatures
- How do I record a SNAP Program Visit?
- How do I record a Request For Assistance Visit?
- How do I record an Anonymous Visit?
- How do I record a Visit using Barcode Scanning?
- How do I record a POH Visit? (Salvation Army *Canada Only*)
- How do I use the Referrals Integration? (Canada Only)
- Managing Double Distribution (CSFP & TEFAP Visits)
General options available when adding a Visit
Attached at the bottom of this guide, you will find a PDF that walks through the steps to login and record a first-time visit for Case Management specifically, this may be helpful for intake workers to have on hand.
All visits can collect the following information:
- What were the reasons for the visit? Check off all that apply.
- Who from the household is receiving services for this visit? All names are checked off by default, but you can uncheck any that do not apply.
- Food Provided: Check off all that apply.
- Items Provided: Check off all that apply.
- Referrals: Check off all that apply.
- Additional Notes/Information: Enter any notes applicable to today's visit. Do not include the characters "<" or ">" when writing notes as the system may read them as code and not save the note correctly. To indicate the note as urgent, check off the Alert box below the Notes area. You can also select Mark this note as private to only be shown to your organization.
Click on the Save button to save changes or Cancel to discard the changes.
See more details on adding a visit depending on the module associated with your organization:
- Pantry Visit ("Standard Module"): your organization tracks the quantity of food supplied (days, lbs, kgs, etc.)
- Voucher Module: your organization tracks the quantity of food supplied (days, lbs, kgs, etc,) and tracks visits using voucher dollars issued and spent. LINK (Possibly removed dependent on reset of content)
- Appointment Module: your organization usually schedules appointments for when clients are to come and tracks the number of hampers supplied, including the type of hamper and when the hamper is picked up. This information appears in a separate article that details more information about appointments and appointment lists.
NOTE: If you leave the Services tab without saving the visit you will see a Leave Site prompt that appears to remind you that “You didn’t record a visit. Do you want to?” It does not appear when a visit has been recorded for the current day.
How do I record a visit using Quick Click?
Quick Click allows users to record visits just by clicking on a client's name after selecting them from a search on the Dashboard page!
How to enable
Organization Permission
- Ensure you are logged in under the agency you wish to enable Quick Click for.
- Navigate to Administration
- Click on the C MGMT Settings tab.
- Under Intake Options, toggle Quick Click on.
- Select Save Changes to save your changes.
User Permission
- Navigate to Administration on the left-hand side of the screen, and select Users.
- Click on the orange edit icon beside the user you wish to provide Quick Click permission for.
- Click on Case Management Specific on the right-hand side.
- Check off Quick Click under Additional Permissions.
- Click Save & Next to save changes.
How to use
Upon logging into Case Management and landing on the dashboard you will now see an option for Quick Click Programs appear above the Client Search area of the page.
- In order to enable this feature simply switch the toggle to ON.
- Once this is done you can then toggle ON any program(s) (you can select more than one at a time), and search for a client.
- Search for a client's name, and when you click on it, the visit type(s) you have selected will be automatically recorded in the client's profile.
- If the program you're recording a visit for requires a signature, the system will prompt you to record a signature for each visit type that needs it.
- A Quick Click Visits history will appear below the search bar.
- You can edit/delete the visit just like you would be able to from the Services tab.
How do I record a Pantry/Food Bank visit?
In order to record a Pantry/Food Bank visit you can follow these steps:
- Click on the Services tab within your client's profile. Click here for information on how to find your client's file.
- Click on the New Visit Food Bank (or whatever the dark blue button is labeled as within your organization) button to add a visit.
- Fill in the following fields:
- Date: automatically set to the current date. This can be changed manually if the pick-up or delivery date has passed.
- Provisions: enter or check off provisions listed that were provided to the household.
- Quantity: enter how much food supplied was given out. This word can vary from days, lbs, kgs, money, points, hampers, or items.
- Delivery: automatically set "No". This can be changed manually if the client's provisions are being delivered.
Please review General options available when adding a Visit above to find the remaining instructions on how to complete a visit.
How do I record a Voucher Program Visit?
This type of visit is used to keep track of transactions made by a household. Clients have a balance and can only spend the "dollars" or "points" in their accounts. Users can track when credit was deposited into the account and when the client made "purchases" at the food bank.
Voucher Details can be found at the top of the Personal tab of a client's profile.
To add a credit simply click on the green Add Credit button.
The renewal date is set 30 days in advance by default but can be changed by Link2Feed Support if requested. Click on the Save button to save changes or Close to discard changes.
In order to record a Voucher Program Visit please follow these steps:
- Click on the Services tab within your client's profile. Click here for more information on how to find your client's file.
- Click on the Voucher button to add a voucher purchase.
- This will bring you to a screen with the following fields to review/fill out:
- The Voucher Details area is a summary of the client's account. It includes the balance of the household, the upcoming renewal date, when credit was last added to the account, and when the account was last used.
- Clicking on the Transactions button will provide you with a more detailed list of the client's transactions (how much was spent and given at each visit).
- Clicking on the Print button will print the voucher details for the client's reference.
- Date: automatically set to the current date. This can be changed manually if the pickup or delivery date has passed.
- Voucher Purchase: indicate how many voucher dollars or points the client is using on this purchase.
- Quantity: enter how much food supplied was given out. This word can vary from days, lbs, kgs, money, points, hampers, or items.
- Delivery Required: automatically set No. This can be changed manually if the client's provisions are being delivered.
- The Voucher Details area is a summary of the client's account. It includes the balance of the household, the upcoming renewal date, when credit was last added to the account, and when the account was last used.
Please review General options available when adding a Visit above to find the remaining instructions on how to complete a visit.
How do I record a Generic Program Visit?
In order to record a Generic Program Visit please follow these steps:
- Click on the Services tab within your client's profile. Click here for more information on how to find your client's file.
- Click on the New Program button to add a visit.
- Complete the following fields:
- Date: automatically set to the current date. This can be changed manually if the pick up or delivery date has passed.
- Delivery: automatically set No. This can be changed manually if the client's provisions are being delivered.
- Provisions: enter or check off provisions listed that were provided to the household.
Please review General options available when adding a Visit above to find the remaining instructions on how to complete a visit.
How do I record a CSFP Visit?
- A client registers for CSFP
- As part of the registration process, they must Certify (i.e. sign to prove that their information is correct and that they are eligible) before they receive food.
- They will then receive food 1/month through to the end of the 6th month after certification.
- On the first of the following month, after the 6 months is up, they must recertify (i.e. sign to prove that their information is STILL correct and that they are STILL eligible).
- They will then receive food 1/month through to the end of the 6th month.
- On the first of the following month, after that 6 months is up, they must recertify again.
Follow these steps to begin the process to enter a CSFP Visit:
- Click on the Services tab within your client's profile. Click here for more information on how to find your client's file.
- The Eligible Programs section in the Household Summary box at the top of the screen will indicate if the client is eligible to have a CSFP visit.
- Click on the New CSFP Visit button to add a visit.
- !!!: If the client has already picked up (or has a pending POS visit), there will be a red icon with !!! and a warning message that the client picked up in the calendar month
If a user is recording a visit at a location that is not the same ad the client's CSFP official location (listed on the CSFP tab of their profile), a notification will appear.
This is letting the user know that this location isn't listed as the client's CSFP location. They can cancel (to go back and update the CSFP tab) or click on Continue which will direct them to the CSFP visit page.
To enter a CSFP visit you will need to complete the following fields:
- Date: automatically set to the current date. This can be changed manually if the pick up or delivery date has passed.
- Quantity: enter how much food supplied was given out. This word can very from days, lbs, kgs, money, points, hampers, or items.
- Delivery: automatically set No. This can be changed manually if the client's provisions are being delivered.
- Double Distribution: recording two visits with one entry; checking off this checkbox will allow you to record the client's current visit and another visit date exactly one month in the future.
-
Food/Items Provided: as mentioned on General options available when adding a Visit, check off all food/items that apply or enter anything not mentioned in the text box under Provide details of other Food Items supplied on this visit.
-
Client eSignature:
- Signature Type: Depending on the CSFP site and the type of signatures they allow to be collected, it can include Typed Signature, Uploaded Image, Sign on Screen, Hard Copy Signature, Verbal or Pre-Typed.
-
Signatory: select who this signature belongs to (it could be one of the proxies).
Client Signature: the signatory's typed name.
Date: the date will automatically be today's date.
To finalize the visit simply click the blue Save button to save changes or hit Cancel to discard the changes.
Visual walk-through of adding a CSFP visit:
Please review General options available when adding a Visit above to find the remaining instructions on how to complete a visit.
How do I record a CSFP Visit for two people in the same household?
To record the CSFP Visit for two people in the same household please follow these steps:
- Click on the Services tab within your client's profile. Click here for more information on how to find your client's file.
- The Eligible Programs section in the Household Summary box at the top of the screen will indicate if the client is eligible to have a CSFP visit.
- Click on the New CSFP Visit button to add a visit.
- See the instructions above for How do I record a CSFP Visit? for more information on recording a CSFP Visit.
- Navigate back to the Personal tab, and find the other household member's name at the bottom of the page in the Household Members section. In the example below, Edith is a household member. Click on the switch icon between the Edit and Remove buttons. This will allow you to switch to view Edith's profile.
- Follow steps 1-4 above to complete additional visit for the other household member.
Creating or Reviewing Non-CSFP clients with CSFP User Permissions
When a user with the CSFP worker role is adding a new client who will NOT be enrolling in the CSFP program the user must skip over the CSFP tab.
Once you have clicked on Save & Next during the client intake process and have arrived at the CSFP page, simply click over to the Services tab to bypass entering CSFP information and record the pantry service.
It's not necessary to select Save & Next in order to serve the client TEFAP or Pantry services.
How do I record a TEFAP Visit?
Follow these steps to begin the process to enter a TEFAP Visit:
- Click on the Services tab within your client's profile. Click here for more information on how to find your client's file.
- The Eligible Programs section in the Household Summary box at the top of the screen will indicate if the client is eligible to have a TEFAP visit.
- Click on the New TEFAP Visit button to add a visit.
To enter a TEFAP visit you will need to complete the following fields (depending on settings some may not be visible):
- Date: automatically set to the current date. This can be changed manually if the pick up or delivery date has passed.
- Quantity: enter how much food supplied was given out. Depending on the set up this can vary from days, lbs, kgs, money, points, hampers, items or something else as it is fully customizable.
- Delivery: automatically set No. This can be changed manually if the client's provisions are being delivered.
- Double Distribution: recording two visits with one entry; checking off this checkbox will allow you to record the client's current visit and another visit date exactly one month in the future.
- Food/Items Provided: as mentioned on General options available when adding a Visit, check off all food/items that apply or enter anything not mentioned in the text box under Provide details of other Food Items supplied on this visit.
-
Client eSignature:
- Signature Type: Depending on the TEFAP site and the type of signatures they allow to be collected, it can include Typed Signature, Uploaded Image, Sign on Screen, Hard Copy Signature, Verbal or Pre-Typed.
-
Signatory: select who this signature belongs to (it could be one of the proxies).
Client Signature: the signatory's typed name.
Date: the date will automatically be today's date.
To finalize the visit simply click the blue Save button to save changes or hit Cancel to discard the changes.
Visual walk-through of adding a TEFAP visit:
Please review General options available when adding a Visit above to find the remaining instructions on how to complete a visit.
eSignatures
Types of signatures can include the following options:
- Typed Signature: manually typed signature using the device's keyboard
- Hard Copy Signature: confirmation check box that a signature was manually written.
- Uploaded Image: image file uploaded from the computer/device
- Client eSignature: using the mouse to sign within the box displayed.
- Verbal Consent: the client gives their consent verbally, the user clicks Save Changes to capture Verbal Consent.
Click here for more information on current available models of signature tools.
Once the signature is completed simply click Save to save changes or Cancel to discard changes.
How do I record a SNAP Program Visit?
In order to record a SNAP Program Visit please follow these steps:
- Click on the Services tab within your client's profile. Click here for more information on how to find your client's file.
- Click on the New SNAP Application button to add a visit.
- Enter the following information:
- Date: date of visit
- Program: specify which program(s) the client applied for during their visit.
-
Location: automatically set to the location the user is logged into. This can be changed manually and should be the location where the SNAP application was done.
- A setting is available to either have this list display the list of organizations in the system or it can be a custom list set up by Network Administrators.
- Source: how the client was referred to the program
- Type of Application: select if this is the first time the client is applying for SNAP or if this application is to recertify their status.
- Service: select whether or not you are providing application assistance/portal assistance or conducting a full interview for the client's benefits.
- Form Type: specify how the application form was completed
-
Status: select the status of the application from the dropdown list.
- Approved, Denied and Submitted are locked statuses for SNAP. To add additional statuses for the SNAP program, go to the Lists page under the Administration menu for Network Administrators to manage.
- A program can only be selected if the status is NOT Accepted, Denied, or Submitted. These are locked statuses. If the visit is set to any other status, you can check off the program(s) the client is applying to. The workflow is to first choose the program(s) the client is applying to.
- Notes: enter any applicable notes about this visit.
- Click Save to save changes or Cancel to discard changes.
How do I record a Request For Assistance Visit?
In order to record a Request For Assistance Visit please follow these steps:
- Click on the Services tab within your client's profile. Click here for more information on how to find your client's file.
- Click on the New Request for Assistance (or whatever the light grey button is labelled at for your organization) button to add a visit.
- Fill in the following fields within the General Visit Details box:
- Date: automatically set to the current date. This can be changed manually if the pickup or delivery date has passed.
- What were the reasons for this visit?: check off any reasons that apply for why the client needs housing or rental assistance.
- From the dropdown list within Crisis Type, select the Housing or Utilities crisis type.
Please see Utilities Assistance below for details on how to complete the rest of the visit.
Please see Housing Assistance below for details on how to complete the rest of the visit.
Housing Assistance
Please complete the following information for each box:
Housing
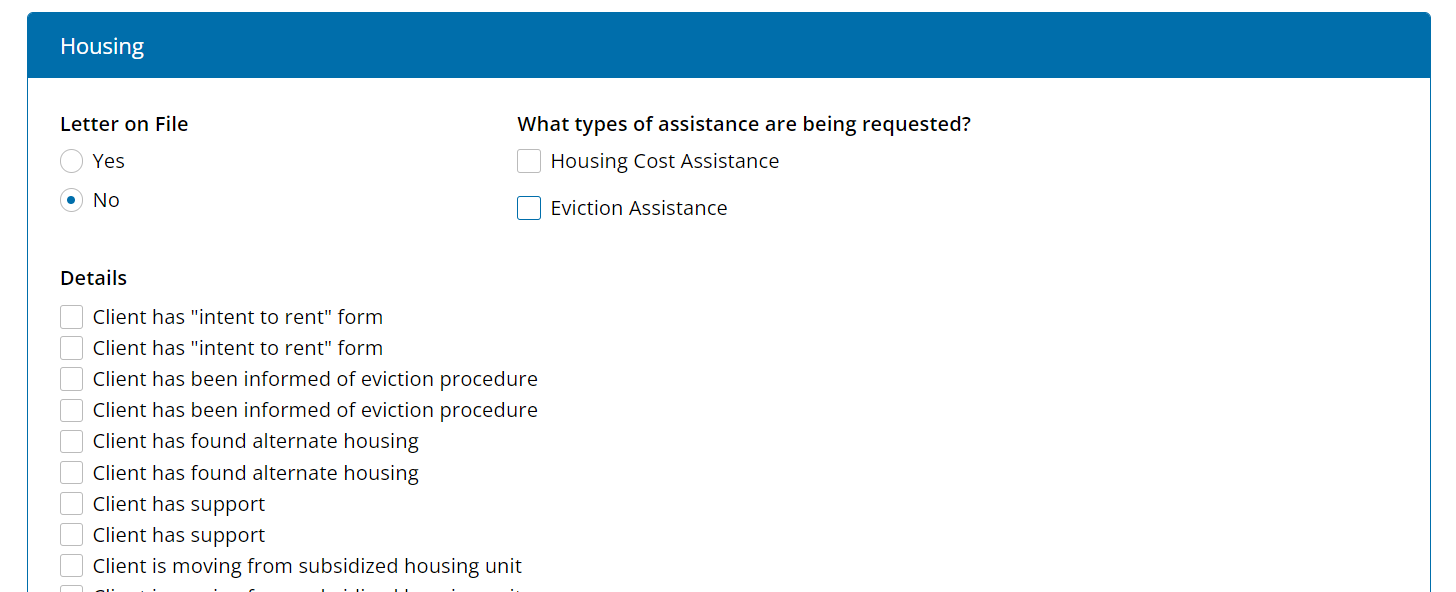
- Letter on File: did the client provide you with a letter from their landlord indicating how much they are in arrears?
- Details: this is a customizable list where you can indicate any additional details you may need to know about the client's situation.
- What types of assistance are being requested?: is the client simply behind on housing costs (Housing Cost Assistance) or have they received an eviction notice (Eviction Assistance).
Housing Cost Assistance
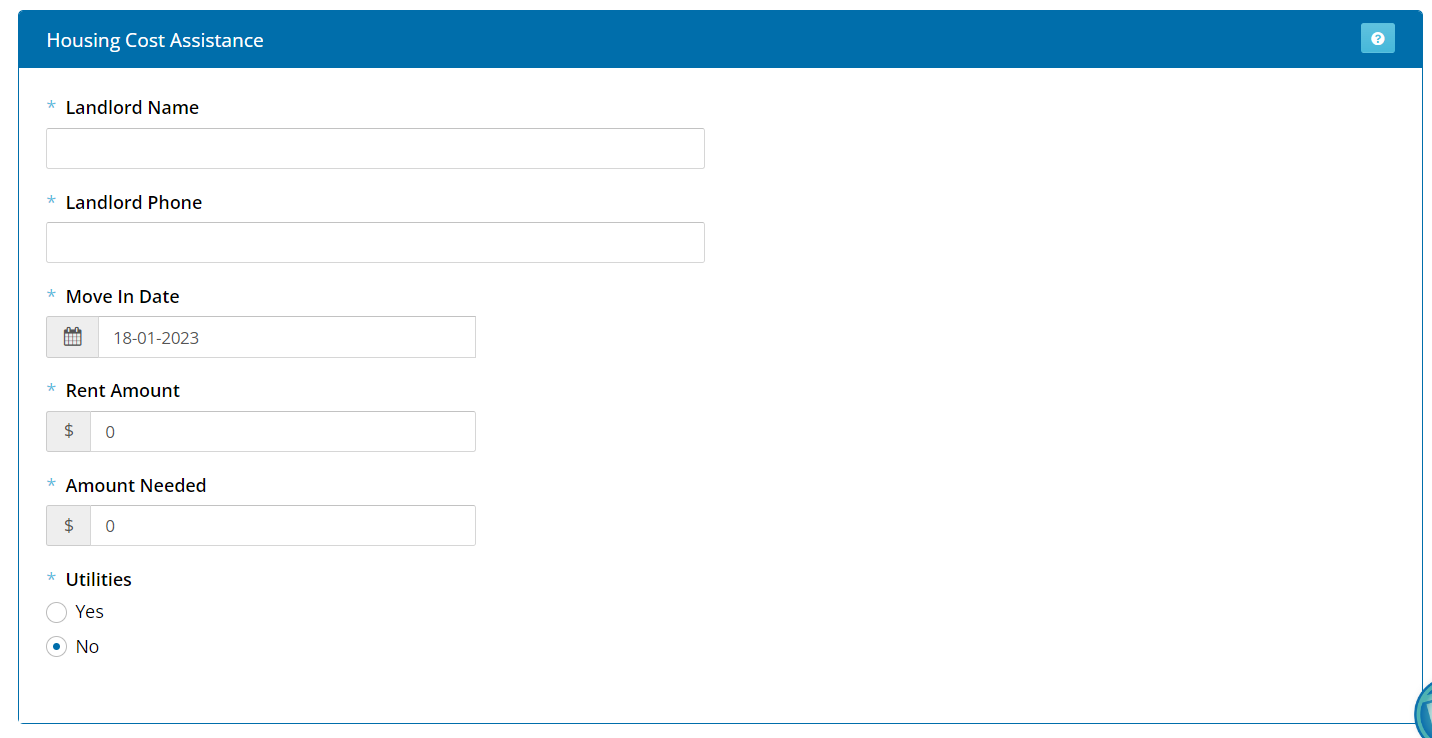
- Landlord Name: the name of the client's landlord or owner of the property.
- Landlord Phone: the phone number of the client's landlord or owner of the property.
- Move In Date: the date the client moved in.
- Rent Amount: monthly rent amount.
- Amount Needed: the total amount that is being asked for to help with housing costs.
- Utilities: does this rent amount include utilities?
Eviction Assistance
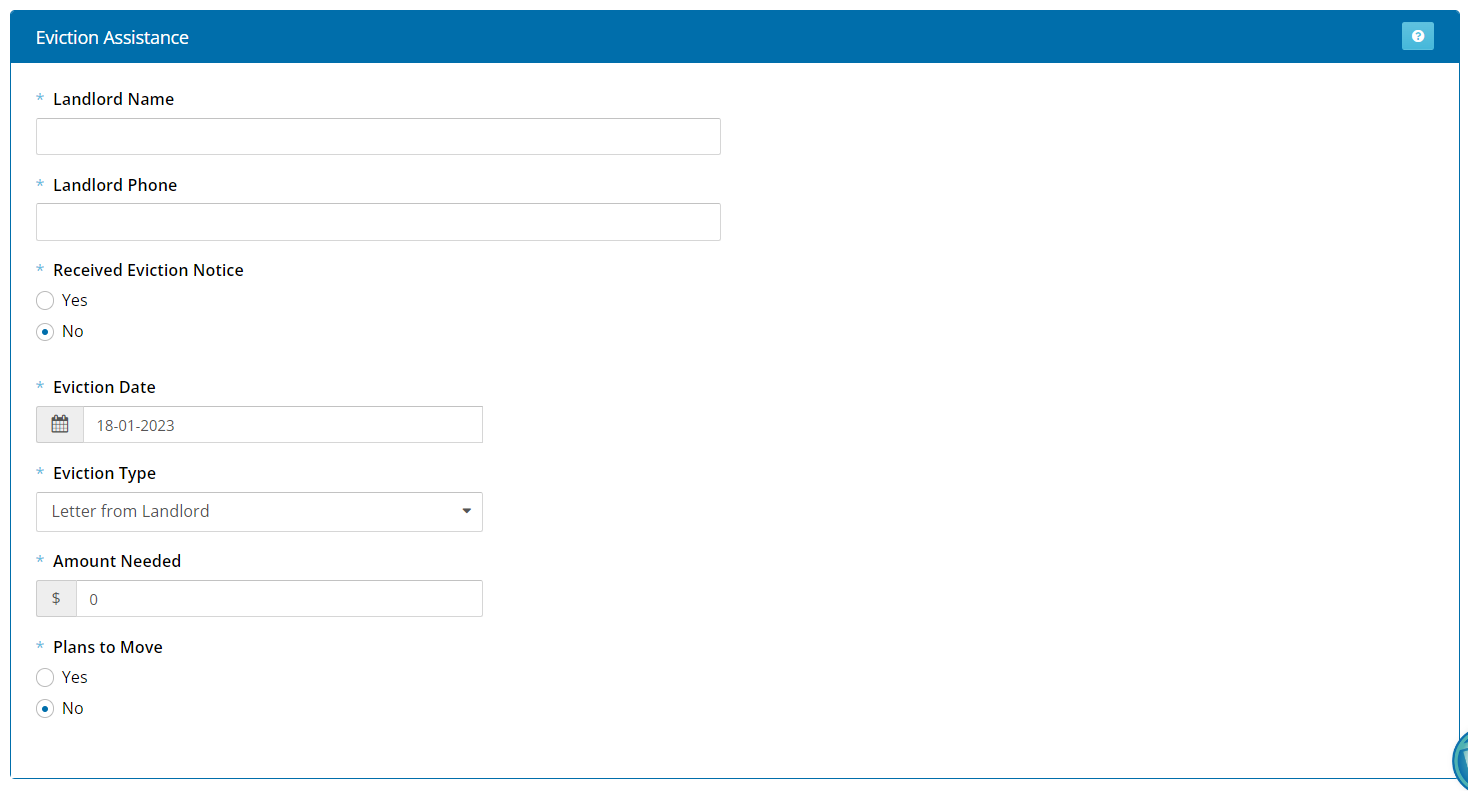
- Landlord Name: the name of the client's landlord or owner of the property.
- Landlord Phone: the phone number of the client's landlord or owner of the property.
- Received Eviction Notice: the client provided a copy of the eviction notice.
- Eviction Date: date of eviction on notice.
- Eviction Type: this is a customizable list can indicate the specific eviction letter type or format used.
- Amount Needed: total amount that is being asked for to help with housing costs and/or to prevent eviction.
- Plans to Move: is the client just trying to pay past rent before leaving or will they continue to live there.
Qualifies for Assistance

Select if the client qualifies for Assistance. If they don't select No and save your changes. If they do, select Yes and continue.
- Appointment Date and Time: when the client is scheduled to come in and speak with a counsellor.
- Appointment Counsellor: this is a dropdown list of all the users in the system who have access to this program.
-
Assistance Provided: just because the client qualifies doesn't mean they will get assistance (e.g. if they already got assistance recently or if the program has reached its quota for this time period)
- If assistance was provided:
- Payable To: the name the cheque will be written out to.
- Cheque Date: the date written on the cheque.
- Cheque Number: the number of the cheque.
- Cheque Amount: the amount written on the cheque.
- Dispersion Method: how the cheque was delivered (e.g. Picked Up, Mailed, Delivered).
- If assistance was provided:
Once completed you can add Additional Notes/Information at the bottom of the page then select Save to save your changes to Cancel to discard changes.
Utilities Assistance
Please complete the following information for each box:
Utilities
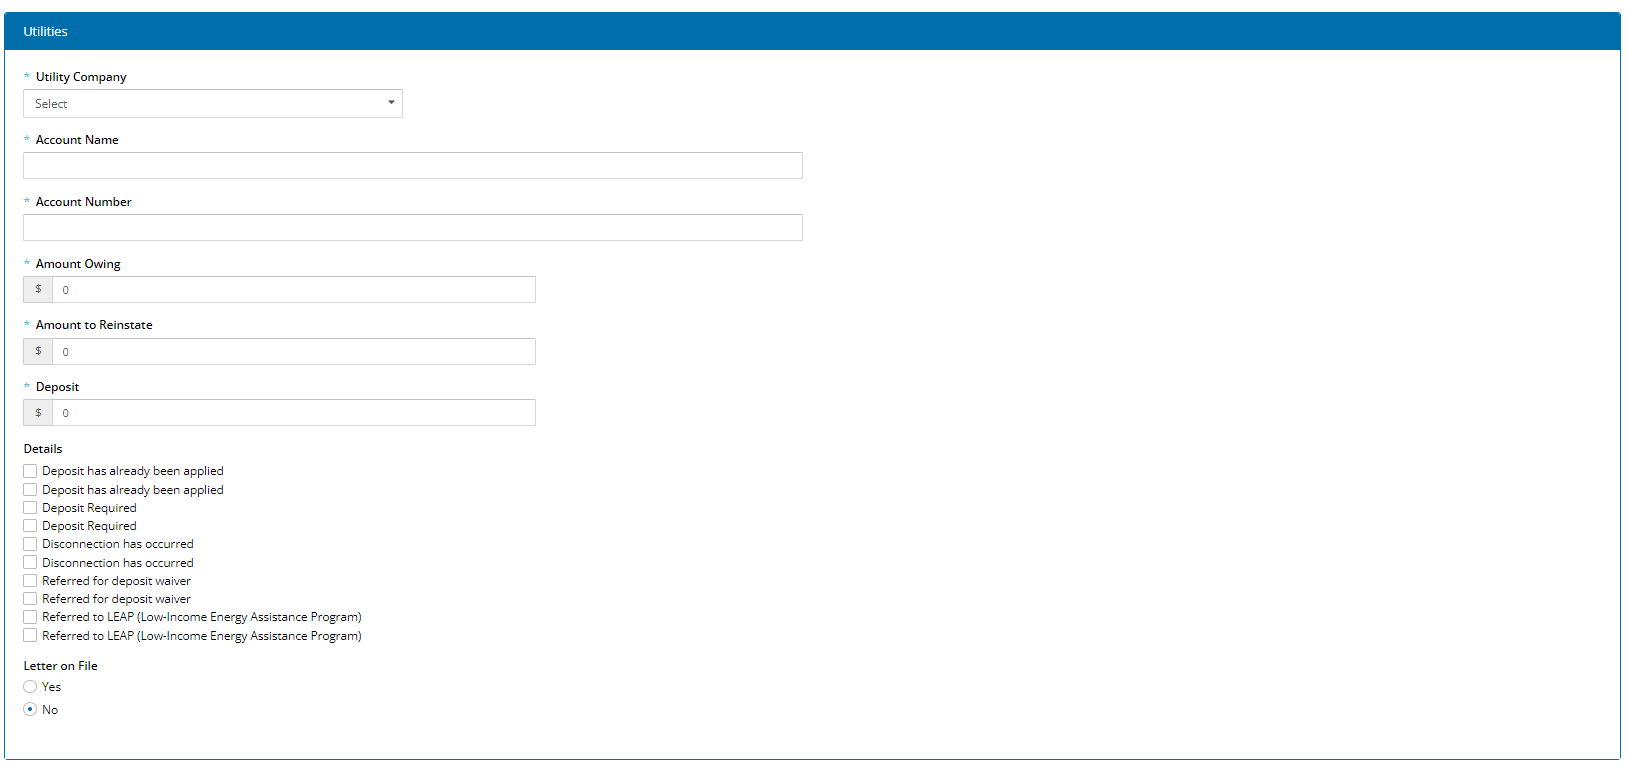
- Utility Company: this is a customizable list; it will be the name of the utility company.
- Account Name: client's name or name on the account of the utility bill.
- Account Number: account number of the utility bill.
- Amount Owing: total amount owed.
- Amount to Reinstate: amount needed to simply reinstate the utility.
- Deposit: the minimum deposit needed.
- Details: any additional details about the circumstance of this utility owed.
- Letter on File: have you been provided with a letter from the client from the utility company about what's owed?
Qualifies for Assistance
Select if the client qualifies for Assistance. If they don't select No and save your changes. If they do, select Yes and continue.
- Appointment Date and Time: when the client is scheduled to come in and speak with a counsellor.
- Appointment Counsellor: This is a dropdown list of all the users in the system who have access to this program.
-
Assistance Provided: just because the client qualifies doesn't mean they will get assistance (e.g. if they already got assistance recently or if the program has reached its quota for this time period)
- If assistance was provided:
- Payable To: the name the cheque will be written out to.
- Cheque Date: the date written on the cheque.
- Cheque Number: the number of the cheque.
- Cheque Amount: the amount written on the cheque.
- Dispersion Method: how the cheque was delivered (e.g. Picked Up, Mailed, Delivered).
- If assistance was provided:
Once completed you can add Additional Notes/Information at the bottom of the page then select Save to save your changes to Cancel to discard changes.
How do I record an Anonymous Visit?
Anonymous visits are also only available for standard non-appointment programs. If your food bank program is appointment-based, it will not appear as an option for an anonymous visit.
To enter an Anonymous Visit please follow these steps:
- Click on New Anonymous Visit on the Client Search or Dashboard page.
- Select one of your programs to add a visit.
- Anonymous Visits can collect the following information (Click on the Select All or Select None button to select or deselect all options in a list more effectively.):
- Date: automatically set to the current date. This can be changed manually if the pickup or delivery date has passed.
- Quantity: enter how much food supplied was given out. This word can vary from days, lbs, kgs, money, points, hampers, or items.
- Delivery: automatically set "No". This can be changed manually if the client's provisions are being delivered.
- What were the reasons for this visit?: Check off all that apply.
- Who from the household is receiving services for this visit?: Enter how many adults and children are in this household.
- Food Provided: Check off all that apply.
- Items Provided: Check off all that apply.
- Referrals: Check off all that apply.
- Notes: enter any information applicable to the visit.
For information on how to view, change, and edit Anonymous visits please click here.
How to enable Anonymous Visits
Those with the Agency Manager user role or above can enable this at the organization level. The feature needs to be enabled at both the organization and user level.
Enabling at the Organization Level
- Go to Administration > Organizations.
- Select the edit icon beside the agency's name.
- Go to the C MGMT tab.
- Scroll down to Intake Options and set Anonymous Clients to On.
- Save your changes.
Enabling at the User Level
- Go to Administration > Users.
- Select the edit icon beside the user's name.
- Click on Case Management Specific at the top right-hand side of the page.
- Under Additional Permissions check off Case Management Anonymous
- Save your changes.
How do I record a Visit using Barcode Scanning?
For full details on barcode scanning, including how to enable and add a barcode to a client profile, click here.
In order to record a Visit using a barcode follow these steps:
- Within the Client search field, you will see a tab added Barcode Search automatically once a Barcode ID type has been enabled.
- Select the Barcode search tab.
- You can set this as your Preferred Search option, click here for instructions.
- If you are using a Barcode Scanner: Place mouse in the text box then scan the client's barcode and you will be brought directly to their profile.
- If you are using a Camera Scanner: Click on Scan Barcode, this will turn on your device camera. Hold the barcode in front of the camera to complete the scan.
Barcode Scanning can ALSO Work with Quick Click, when Quick Click is turned on simply scan the barcode to automatically record the visit.
How do I record a POH visit? (Salvation Army *Canada Only*)
Please navigate here for these details.
How do I use the Referrals Integration? (Canada Only)
This option needs to be enabled by Link2Feed Admin. A Network Administrator would need to contact Link2Feed Support to enable this option.
Using referrals integration replaces the Referred To section of the new visit page with a 211 referral list.
- Location: the zip/postcode will automatically be set to the same one as the agency the user is logged into. The user can change it to any other zip/postcode they'd like.
- Distance (km): there is a dropdown list of distance in km and the user can manually enter a distance as well.
- Category: this is the list of main 211 categories.
- Sub-Category: this is the list of sub-categories based on the category selected.
Clicking on the magnifying glass on the right will show a list of options.
- Check off the service(s) you referred the client to.
- The folder icon on the right will provide you with a printer-friendly page of the organization's services.
Click on Add Referral to do another search of another category and sub-category to refer the client to.
If there are no referrals, you can always select None.
Managing Double Distribution (CSFP & TEFAP Visits)
The Double Distribution feature is available for TEFAP and CSFP programs.
When enabled, a checkbox labeled Double Distribution appears beside the visit date.
If the user clicks on it and saves the visit, a visit for the current date and the same date next month will be recorded in the client’s profile. For example, if a double distribution visit is saved on March 18, 2020, a visit will automatically be recorded in the client’s profile for both March 18 and April 18, 2020.
For CSFP visits, clients are only allowed one visit a month. If a double distribution visit is made, it will not allow the user to record a visit in the client’s profile the following month.